
Heavenly No-Knead Dill Gouda Artisan Bread: A Culinary Delight
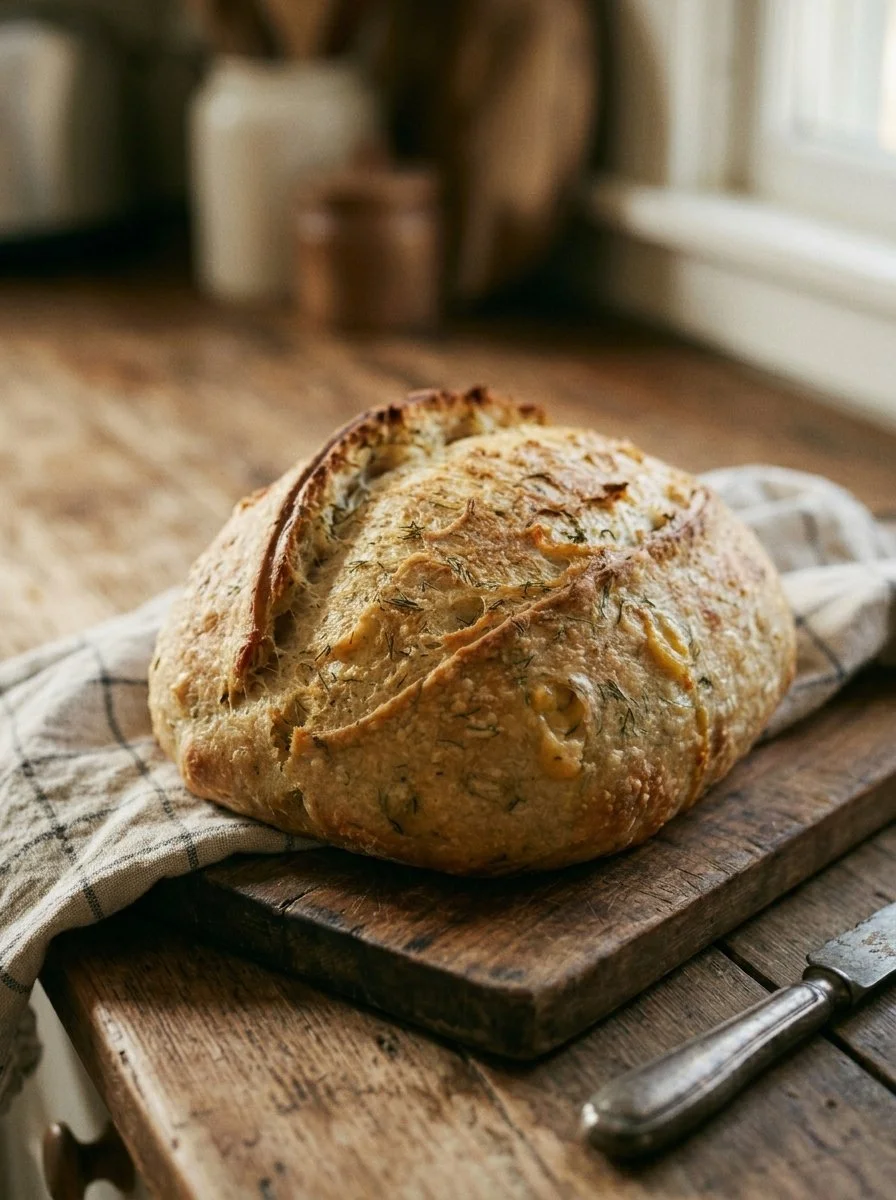
Take a deep breath and savor the enticing aroma of fresh-baked bread wafting through your kitchen. As you slice into the golden crust, the satisfying crackle makes your mouth water, and the warm, gooey Gouda mingles with aromatic dill, making it nearly impossible to resist taking a bite. Each mouthful offers a delightful texture that is both chewy and fluffy, a testament to the unique process of no-knead baking.
The Origin & Heritage
The roots of No-Knead Dill Gouda Artisan Bread can be traced back to traditional European bread-making techniques, reminiscent of cherished moments in Grandma’s kitchen. In generations past, families would gather around the hearth, the sweet scent of freshly baked bread welcoming them. This method allows the dough to develop flavor slowly, making it not only a delicious recipe but also a part of a cultural legacy that fosters togetherness and warmth.
The Science of Flavor
- Hydration Level: The high water content creates a moist environment that enhances gluten development, leading to a chewy crumb.
- Yeast Activation: Instant yeast works efficiently at room temperature, contributing to the bread’s flavor profile even as it rises slowly.
- Dill’s Freshness: The oils in fresh dill release aromatic compounds that enhance the overall taste experience.
- Gouda’s Richness: The unique flavor of aged Gouda adds a creamy, nutty character that balances the bread’s savory notes.
- Crust Formation: Baking in a Dutch oven traps steam, ensuring a crispy crust while keeping the interior soft and airy.
The Ingredients
Main Ingredients
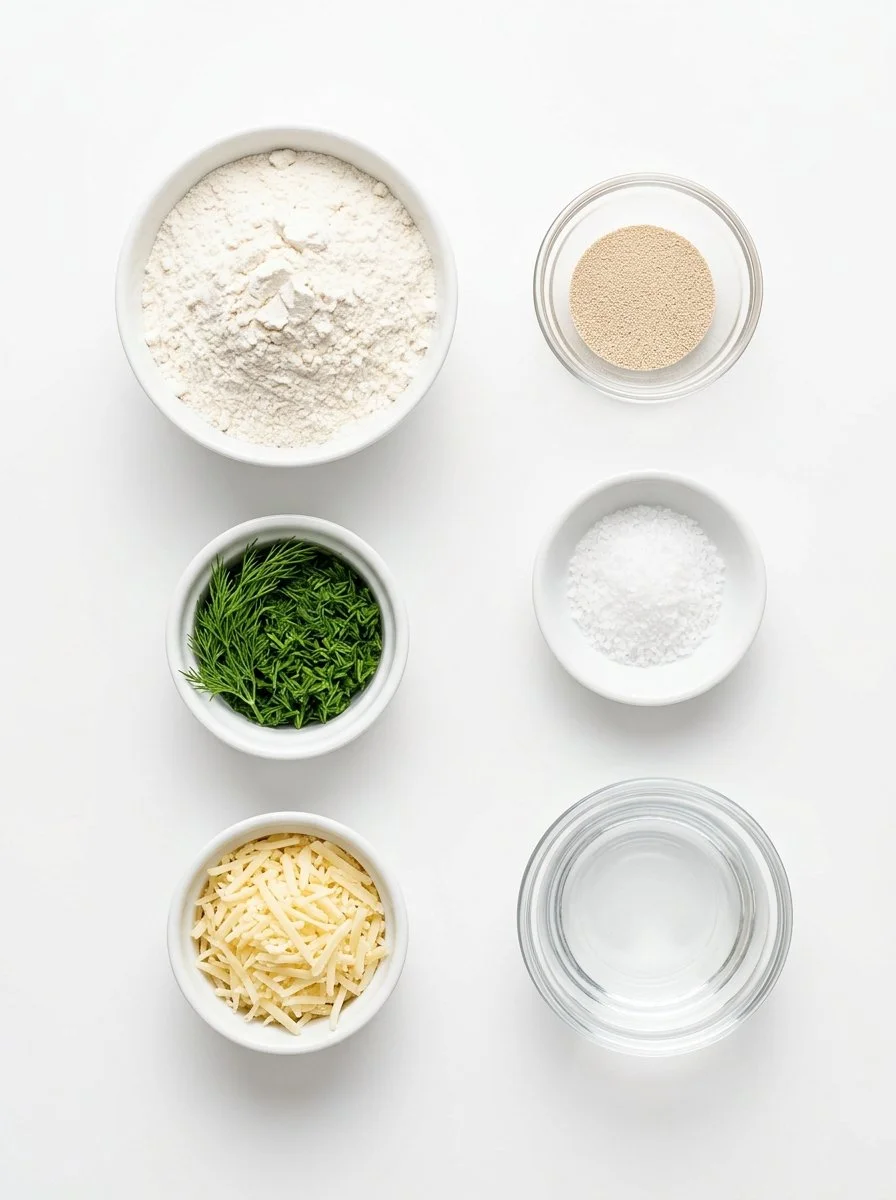
- 3 cups all-purpose flour
- 1 1/4 teaspoons salt
- 1/2 teaspoon instant yeast
- 1 1/2 cups water
- 1/2 cup grated Gouda cheese
- 1/4 cup fresh dill, chopped
Pro-Notes
- Flour: Use bread flour for a chewier texture and improved gluten formation.
- Cheese: Opt for aged Gouda to intensify flavor depth in your bread.
The Masterclass Instructions
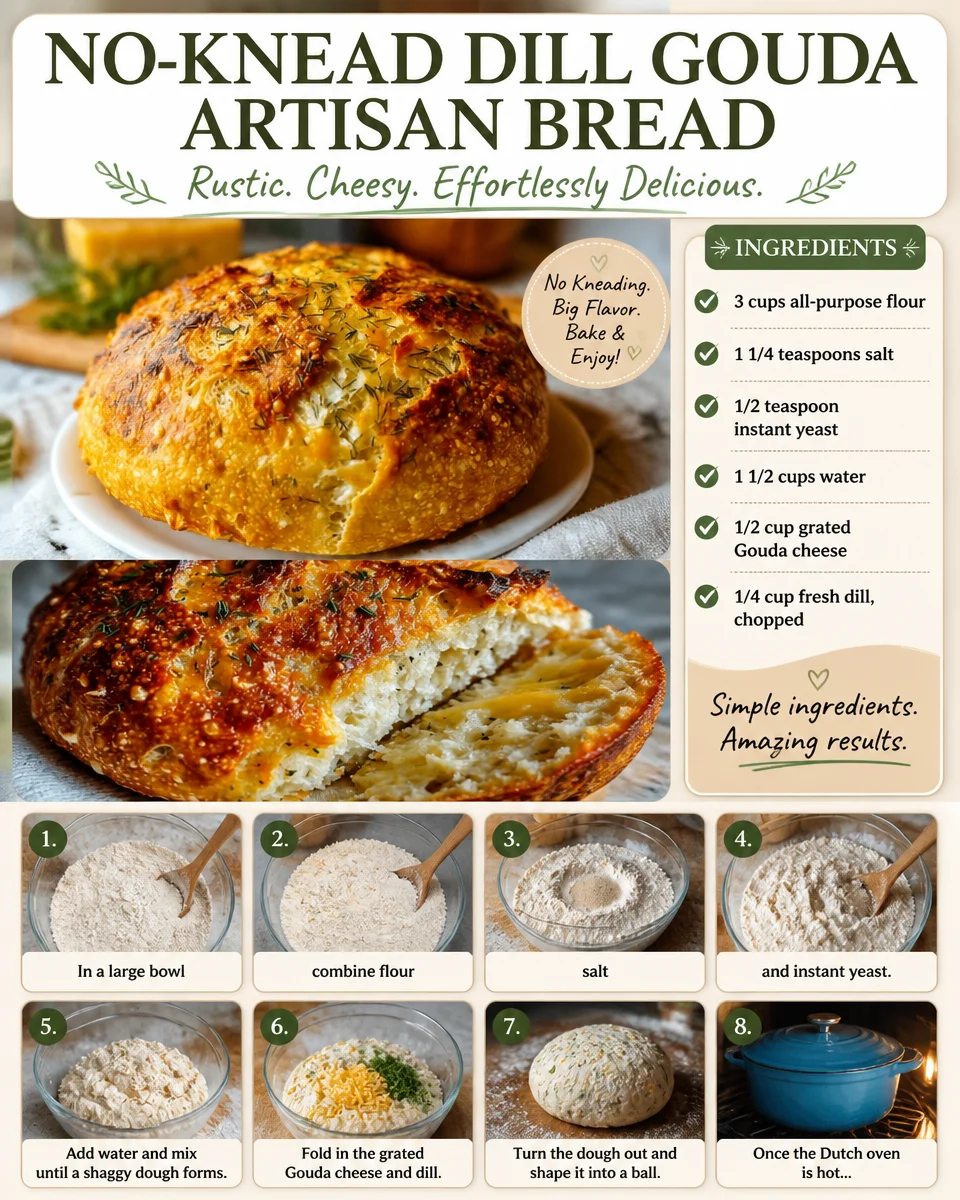
- In a large bowl, combine the flour, salt, and instant yeast.
- Add water and mix until a shaggy dough forms, ensuring no dry flour remains visible.
- Fold in the grated Gouda and chopped dill, creating a rich dough infused with flavor.
- Cover the bowl with plastic wrap and let it rest at room temperature for 12-18 hours, allowing the magic of fermentation to work.
- Preheat your oven to 450°F (230°C) and place a Dutch oven inside to heat up.
- On a floured surface, turn the dough out and shape it into a ball, being careful to retain as much air as possible.
- Once the Dutch oven is hot, carefully place the dough inside without burning yourself.
- Cover and bake for 30 minutes, then remove the lid and bake for an additional 15 minutes until the crust is golden brown.
- Allow the bread to cool on a wire rack before slicing, letting the flavors settle in.
A Healthier Perspective
Boost the nutritional value of your No-Knead Dill Gouda Artisan Bread with these tips:
- Add seeds: Incorporate flaxseeds or chia seeds for a dose of omega-3 fatty acids and fiber.
- Whole grain flour: Mix in whole wheat flour to increase the bread’s fiber content and overall nutrition.
Gouda cheese is not just flavorful; it’s also a good source of calcium, essential for maintaining strong bones.
The Troubleshooter
If your bread doesn’t turn out as expected, here are a few common pitfalls and solutions:
- Why did the dough not rise? It may be due to old yeast. Ensure your yeast is fresh for optimal fermentation.
- Why is the bread too dense? Make sure to include sufficient water in your dough; adequate hydration is crucial for a light texture.
- Why did the crust burn? Monitor your oven’s temperature, as every oven varies and it may require adjustments.
The Art of Serving
Serve your No-Knead Dill Gouda Artisan Bread warm, sliced thick, alongside a rich, creamy butter or a light olive oil dip. Pair it with a refreshing salad or a hearty soup for a complete meal. A glass of chilled white wine or herbal tea rounds out the perfect dining experience.
The Dietary Lab
For dietary modifications, here’s a quick guide:
- Vegan: Substitute Gouda with a plant-based cheese alternative and use water instead of any dairy.
- Gluten-Free: Use a gluten-free flour blend to create a suitable version of this artisan bread.
Storage & Revival
- Yield: Approximately 1 large loaf
- Prep Time: 15 minutes (plus resting overnight)
- Cook Time: 45 minutes
To revive your bread’s fresh-baked texture, reheat in the oven at 350°F for about 10 minutes. Avoid microwave reheating to maintain its crust’s integrity.
FAQ
What type of flour is best for this bread?
All-purpose flour works well, but bread flour can improve texture.
Can I substitute fresh dill with dried dill?
Yes, but use only about a third of the amount since dried herbs are more concentrated.
How long can I store this bread?
It remains fresh for about 3 days at room temperature in a sealed bag.
What if I don’t have a Dutch oven?
A heavy baking sheet inverted over a loaf pan can serve as a substitute.
Is it possible to freeze this bread?
Yes, slice the bread and wrap it tightly before freezing to preserve freshness.
Can I add other herbs?
Absolutely! Experiment with thyme or rosemary for different flavor profiles.
What’s the best way to slice this bread?
Use a serrated bread knife for clean, even slices.
Can this dough be made in advance?
Yes, you can refrigerate the dough after the initial rise for up to 3 days for added flavor.
Does this bread require oil?
No oil is required, as the Gouda provides enough moisture and richness.
Is this recipe scalable?
Indeed, you can adjust the ingredient amounts according to your needs.
Take a moment to relish the effort you put into crafting this remarkable No-Knead Dill Gouda Artisan Bread. Each bite tells a story, evoking memories of shared meals and cherished moments. If you enjoyed this recipe, leave a comment below if you tried the Heavenly No-Knead Dill Gouda Artisan Bread! You might also be interested in our banana bread brownies with brown butter frosting, our delightful rustic garlic rosemary skillet bread, or explore a classic focaccia recipe. Happy baking!
No-Knead Dill Gouda Artisan Bread
Ingredients
Method
- In a large bowl, combine the flour, salt, and instant yeast.
- Add water and mix until a shaggy dough forms, ensuring no dry flour remains visible.
- Fold in the grated Gouda and chopped dill, creating a rich dough infused with flavor.
- Cover the bowl with plastic wrap and let it rest at room temperature for 12-18 hours.
- Preheat your oven to 450°F (230°C) and place a Dutch oven inside to heat up.
- On a floured surface, turn the dough out and shape it into a ball, being careful to retain as much air as possible.
- Once the Dutch oven is hot, carefully place the dough inside.
- Cover and bake for 30 minutes, then remove the lid and bake for an additional 15 minutes until the crust is golden brown.
- Allow the bread to cool on a wire rack before slicing.