rustic garlic rosemary skillet bread is my go to fix for those days when you want “real bread” but you do not want to babysit dough for hours. I started making it when I realized I kept buying bakery loaves, then letting half of them go stale on the counter. This one is warm, salty, and smells like garlic the second it hits the oven. It also feels a little special, like something you would serve with soup on a rainy night, even though it is honestly pretty simple. If you have a skillet and a bowl, you are already halfway there. 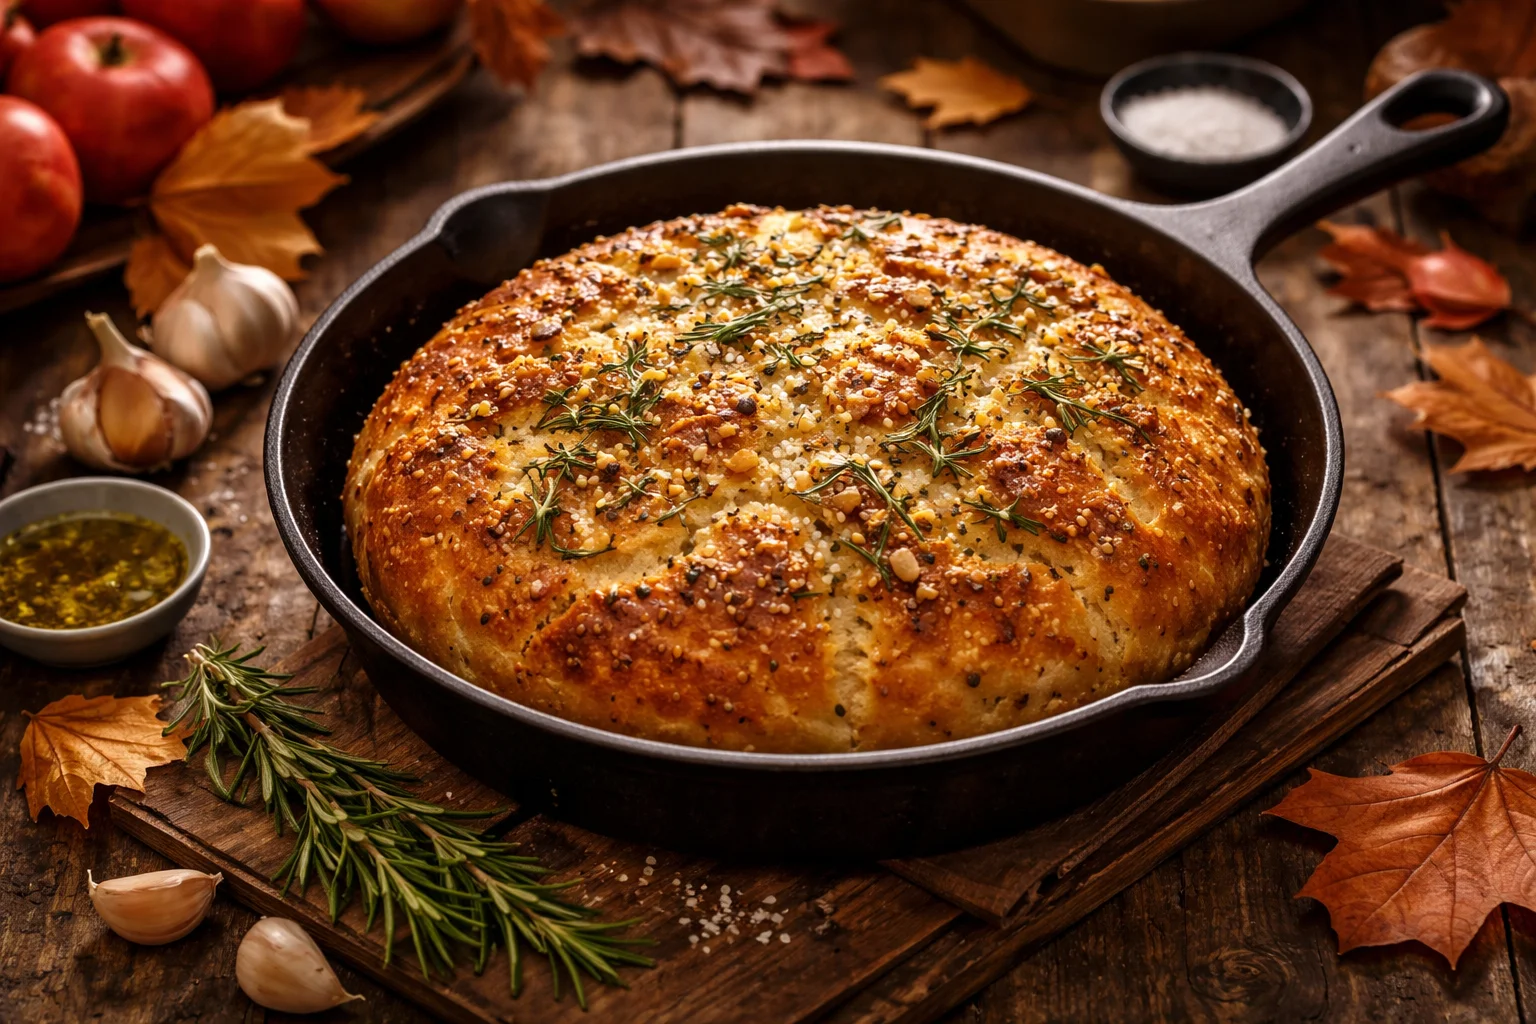
Key Ingredients for Garlic Rosemary Skillet Bread
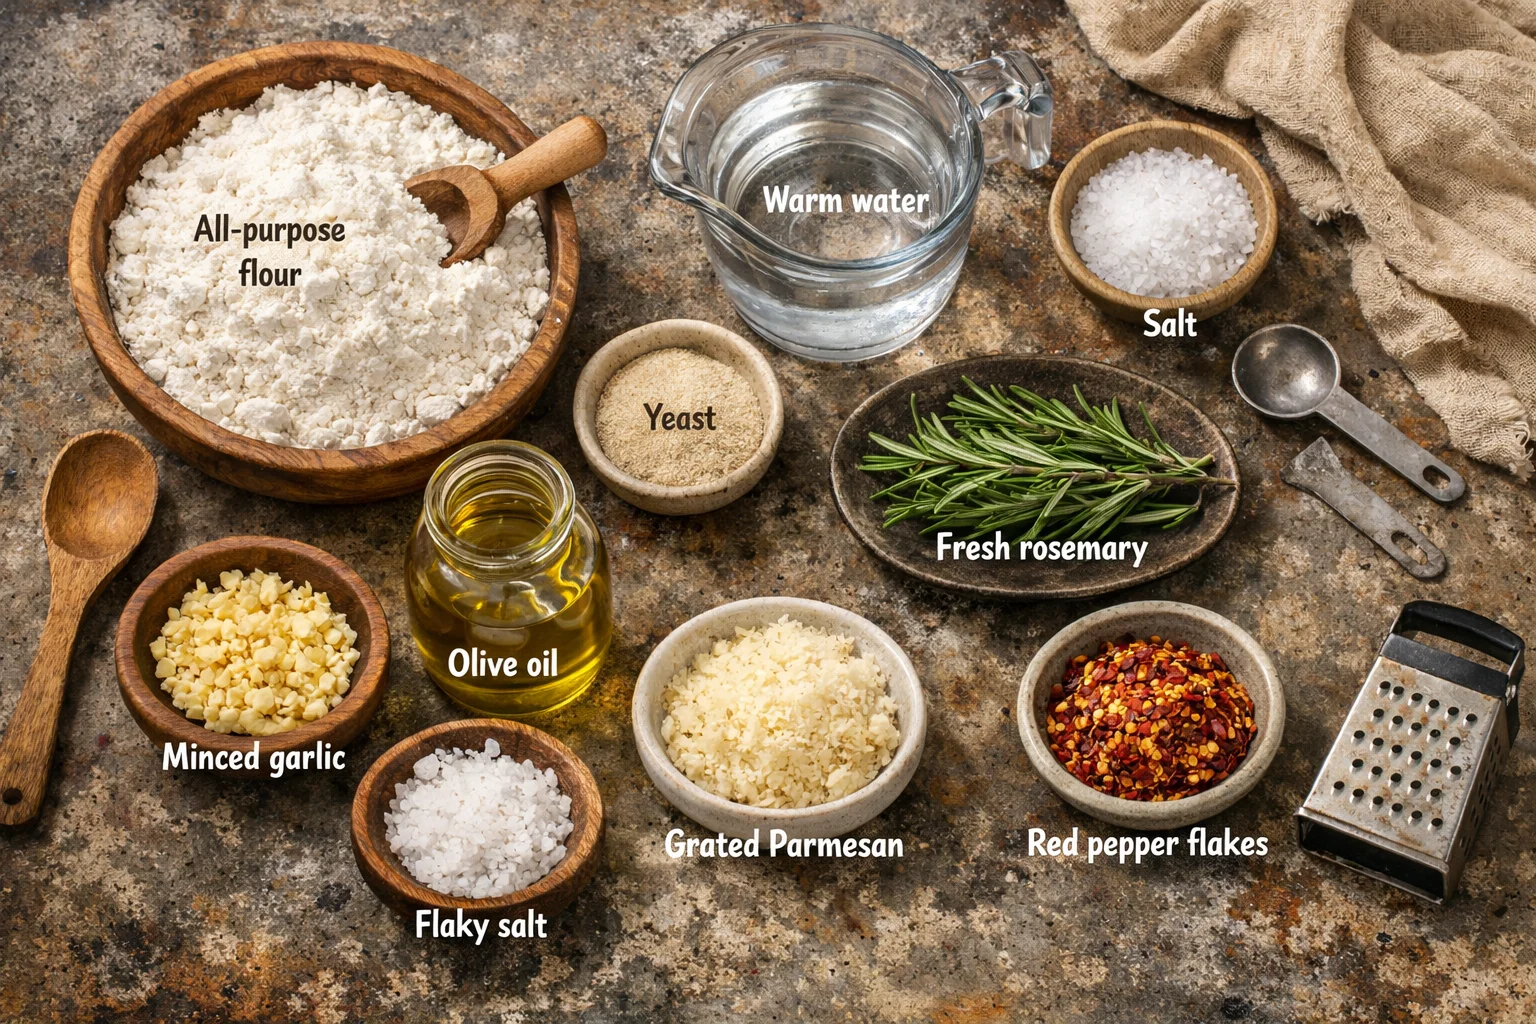
Let’s keep this practical. The ingredients are basic, but each one does something important. When I first tested this, I tried swapping things randomly and yep, the bread still worked, but the best version came from using a few key staples the right way.
What you will need and why it matters
- All purpose flour: dependable, easy to find, and gives you that tender inside with a sturdy crust.
- Yeast: instant yeast is easiest, but active dry works too. Yeast is what makes it puff up and turn bready instead of dense.
- Warm water: think warm bath water, not hot. If it is too hot, yeast gets cranky and stops working.
- Salt: do not skip it. Bread without salt tastes like a pillow.
- Olive oil or melted butter: adds flavor and helps the crust brown nicely in the skillet.
- Garlic: fresh minced garlic is my favorite. Garlic powder works in a pinch, but fresh gives you that real aroma.
- Rosemary: fresh is amazing, dried is fine. If using dried, use less because it is stronger.
- Optional add ins: flaky salt on top, a little grated parmesan, or a pinch of red pepper flakes if you like heat.
One quick note on rosemary: if you use fresh, chop it fairly small so you do not end up pulling long needles out of your teeth. I learned that the hard way while trying to look cute eating bread in front of friends.
Step-by-Step Instructions for Perfect Bread
This is the part where people get nervous, but I promise it is not complicated. The dough should look a little messy at first, then it comes together. You do not need a fancy mixer, and you do not need to be a bread person to pull this off.
Simple steps that actually work
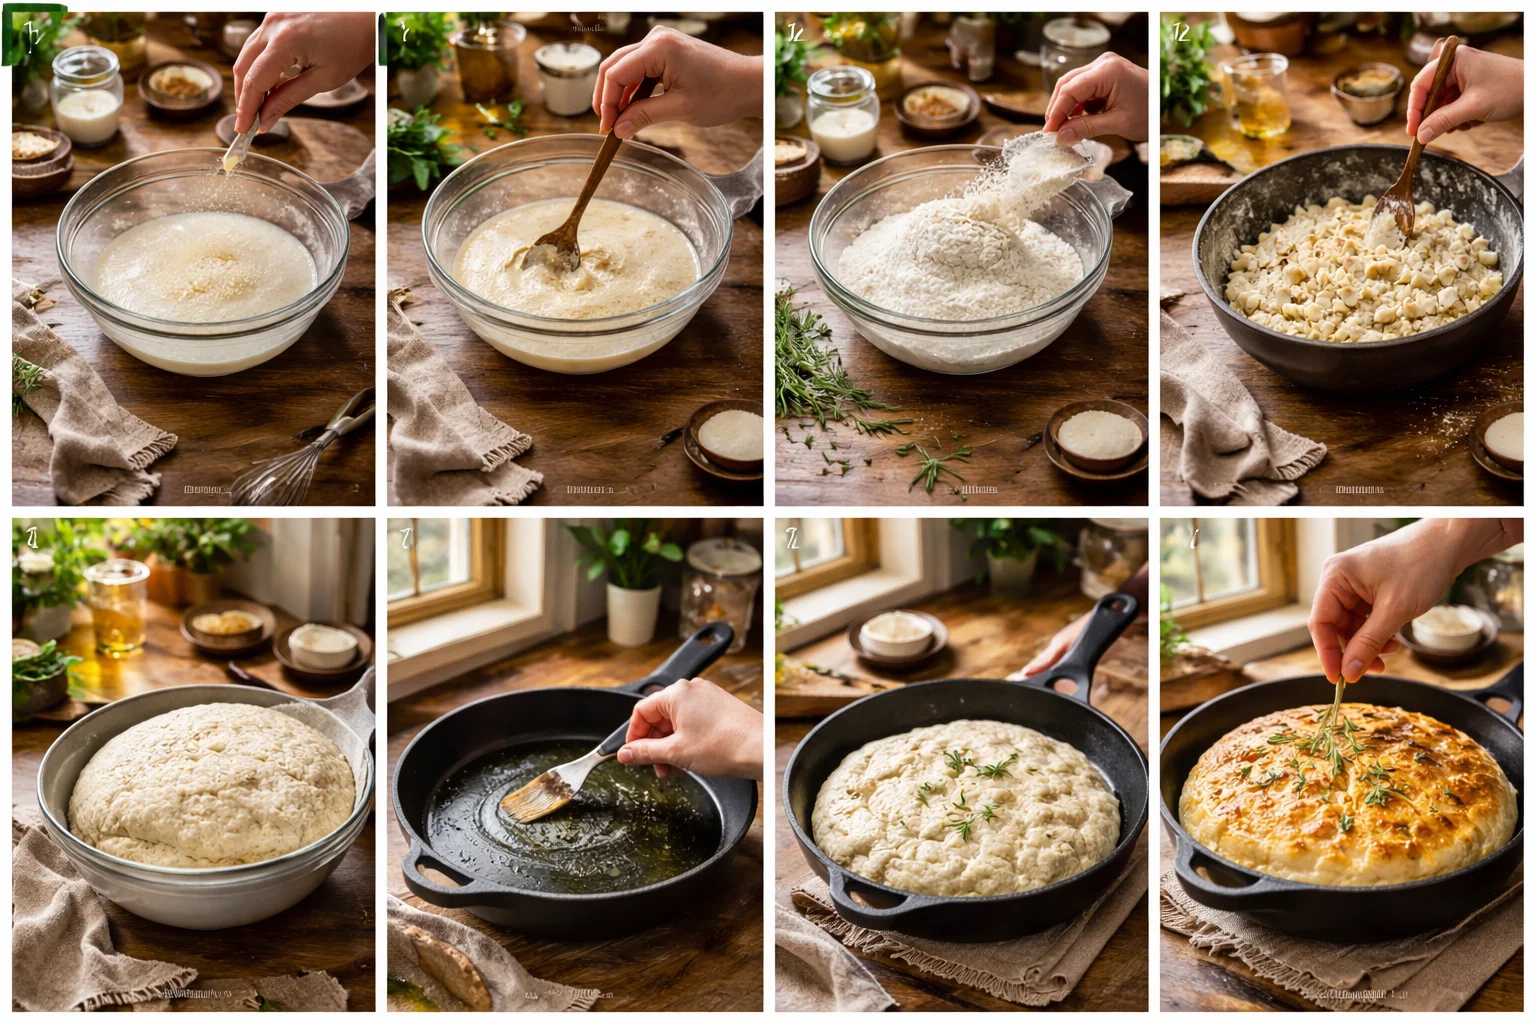
1. Wake up the yeast. In a large bowl, mix warm water with yeast. If you are using active dry yeast, give it 5 to 10 minutes until it looks foamy. Instant yeast can be mixed right in and kept moving.
2. Mix the dough. Stir in flour, salt, olive oil or melted butter, minced garlic, and chopped rosemary. Use a spoon until it gets shaggy, then use your hands for a minute or two. If it feels super sticky, add a tablespoon of flour at a time. If it feels dry and hard to mix, add a tiny splash of water.
3. Let it rise. Cover the bowl with a clean towel. Put it somewhere cozy for about 45 to 60 minutes, until it looks puffier. In my kitchen, I set it near the stove while the oven preheats.
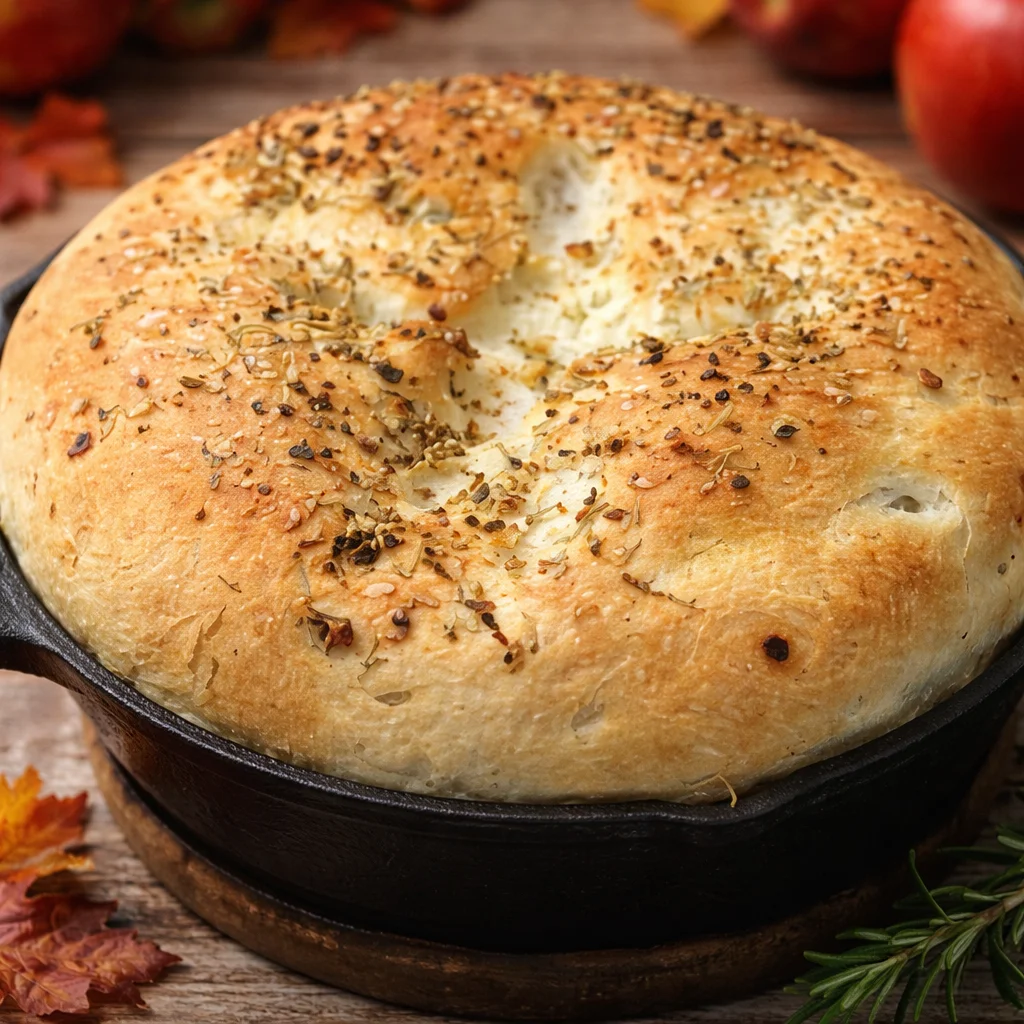
4. Prep the skillet. Use a cast iron skillet if you have one. If not, any oven safe skillet works. Add a swirl of oil or a pat of butter and coat the bottom. This is what gives that golden crust.
5. Shape and rest. Gently press the dough into the skillet. Do not overthink the shape. Rustic is the whole vibe here. Let it rest 10 to 15 minutes while the oven finishes heating.
6. Bake. Bake at 400 F until deeply golden on top, usually 20 to 25 minutes depending on your pan and oven. If the top browns too fast, loosely cover it with foil for the last few minutes.
7. Finish it. Brush the top with melted butter or olive oil right after baking. Add flaky salt if you want that bakery style bite. Let it cool for 10 minutes before slicing so the inside sets and does not turn gummy.
When I pull this out, the smell always makes people wander into the kitchen like cartoon characters floating toward a pie. That garlic and rosemary combo is just unfair in the best way.
Tips for Variations and Serving Suggestions
This bread is a regular at my house because it plays nice with so many meals. Also, if you have picky eaters, you can tweak it without starting over. I do that a lot, especially when I am trying to use up whatever is sitting in the fridge.
Easy variations: Add a handful of shredded mozzarella or parmesan into the dough. Swap rosemary for thyme if that is what you have. Mix in chopped olives for a salty punch. If you want a softer garlic flavor, roast the garlic first and mash it in. If you want it sharper, sprinkle a little garlic powder on top before baking.
Serving ideas: Slice it into wedges and serve with tomato soup, chili, or a big salad. It is also amazing with eggs in the morning, especially if you toast a slice and add butter. If you are hosting, put it on the table with olive oil and balsamic for dipping and watch it disappear.
;
“I made this for a last minute dinner with friends and it was the first thing that vanished. People were ripping off pieces before I even brought the soup out.”
One of my favorite moves is turning leftovers into garlic bread croutons. Just cube it, toss with a bit of oil, and bake until crisp. It makes salads feel like a restaurant situation without the price tag.
Common Mistakes to Avoid When Making Skillet Bread
I have made every mistake so you do not have to. Skillet bread is forgiving, but a few small things can mess with the rise or texture. These are the issues I see most often when friends text me panic photos of dough.
Mistake 1: Water that is too hot. If your water is hot to the touch, it can kill the yeast. Aim for warm, not steaming.
Mistake 2: Adding too much flour. A slightly sticky dough is normal. If you keep adding flour until it is totally dry, the bread can turn dense. Add flour slowly and stop once it is manageable.
Mistake 3: Not giving it time to rise. If your kitchen is cold, it might take longer than 60 minutes. Look for dough that is noticeably puffed, not just “maybe bigger.”
Mistake 4: Skipping the oil in the skillet. That oil is not just for flavor. It helps the bottom crisp and keeps sticking away. Even a nonstick pan benefits from a little fat here.
Mistake 5: Cutting too soon. I know, it smells amazing. But if you slice it right away, the inside can get gummy. Give it a short rest so it finishes setting.
If your bread ever comes out a bit pale, bake it a few minutes longer next time. Color equals flavor with bread. You want it golden and proud, not timid.
Nutritional Information and Serving Size
Let’s talk about what you are actually eating, in a normal person way. This bread is not a salad, but it is also not a frosted cake. It is a comfort food side that can fit into real life meals.
Serving size: I usually cut the skillet into 8 wedges. If it is paired with soup or pasta, 1 wedge is plenty. If it is sitting out as a snack, people will absolutely go back for another piece, so plan accordingly.
General nutrition notes: The main calories come from flour and oil or butter. Garlic and rosemary add tons of flavor without adding much in terms of calories. If you want to lighten it a little, use olive oil instead of butter and keep the brushing on top modest. If you want a richer bread, butter is your friend.
Diet notes: This is naturally vegetarian if you use olive oil. To make it dairy free, stick with oil and skip cheese add ins. For gluten free, you will need a gluten free flour blend made for yeast baking, and the texture will be different, but it can still be tasty.
And because someone always asks, yes, rustic garlic rosemary skillet bread is best the day it is baked, but it toasts really well on day two. I store it in a sealed container at room temp for a day or two, then move it to the fridge if it is still hanging around.
Common Questions
Can I make the dough ahead of time?
Yes. Mix the dough, cover it, and refrigerate it for up to 24 hours. Let it come back toward room temp and puff a bit before pressing it into the skillet and baking.
What if I do not have a cast iron skillet?
No problem. Use any oven safe skillet or even a round cake pan. You might lose a little of that cast iron crust magic, but it will still be delicious.
How do I know when it is fully baked?
The top should be deep golden, and the bread should sound a bit hollow when you tap it. If you are unsure, bake it 3 to 5 minutes longer.
Can I use dried rosemary instead of fresh?
Totally. Use about one third the amount since dried rosemary is stronger. Crush it between your fingers first to wake up the flavor.
Why is my bread dense?
Usually it is from not enough rise time or from adding too much flour. Next time, let the dough get properly puffy and keep it slightly tacky before baking.
A cozy loaf you will want on repeat
If you have been craving something warm and homemade, rustic garlic rosemary skillet bread is such an easy win. It uses simple ingredients, it bakes in one pan, and it makes the whole kitchen smell like you know what you are doing. If you want to compare versions, I also like reading recipes like Easy Garlic Rosemary Skillet Bread – 2 Cookin Mamas and Garlic and Rosemary Skillet Bread – The Food Charlatan because they have their own little twists and tips. Now go grab your skillet and make it once, then watch how fast it becomes a habit. 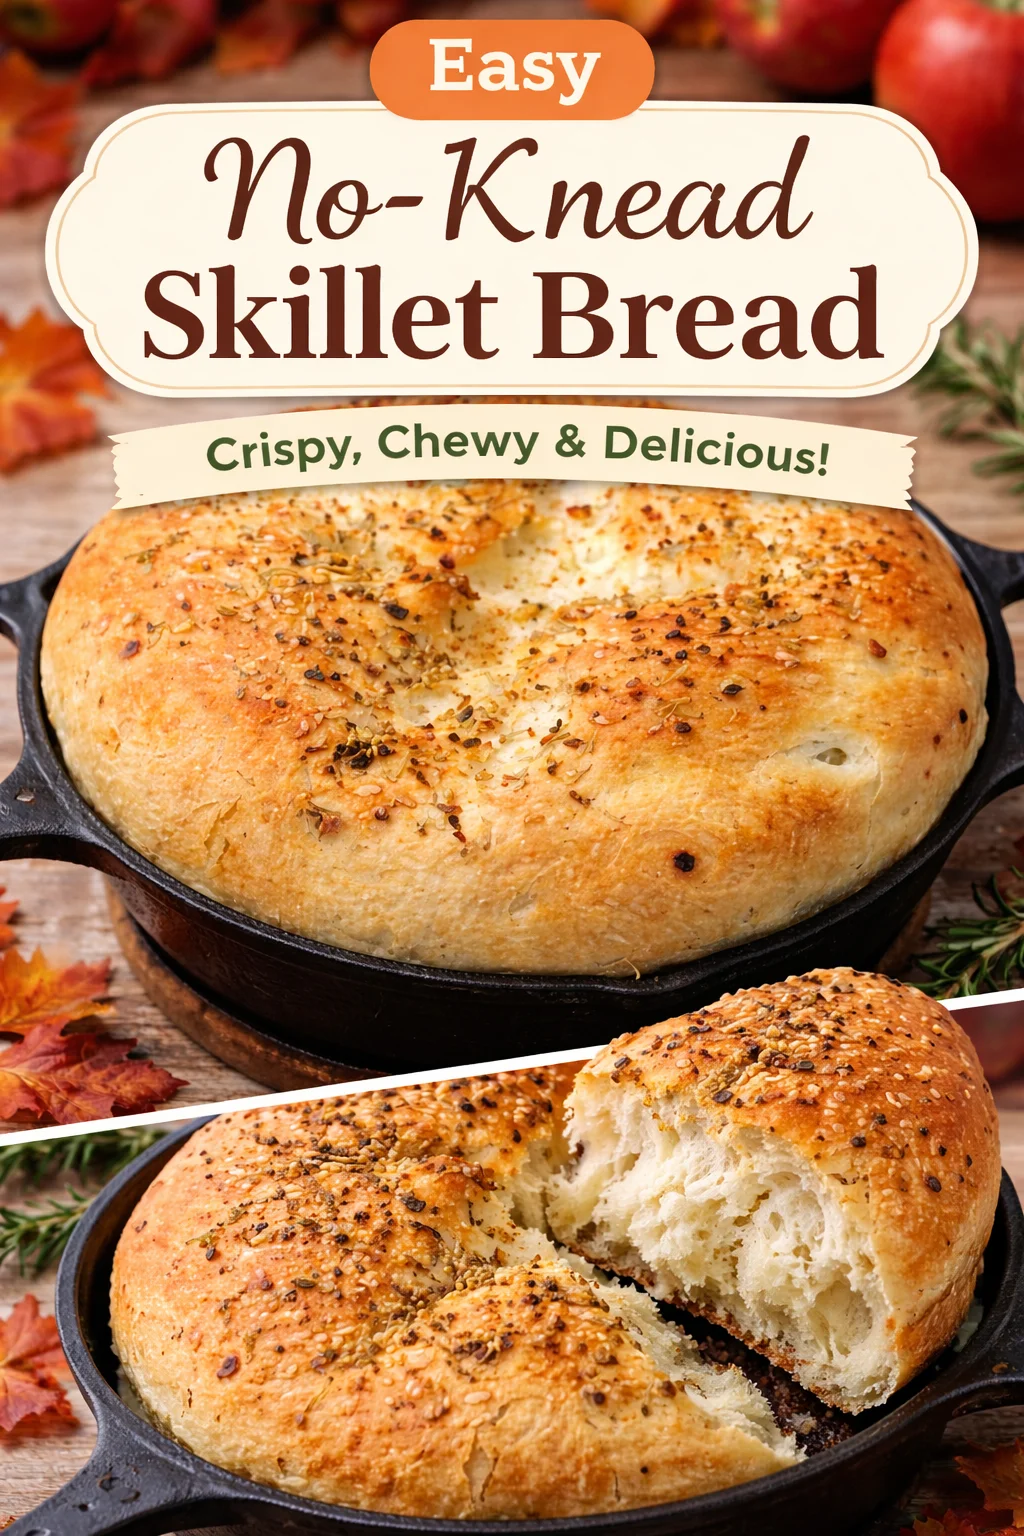
Garlic Rosemary Skillet Bread
Ingredients
Method
- In a large bowl, mix warm water with instant yeast. If using active dry yeast, let it sit for 5 to 10 minutes until foamy.
- Stir in flour, salt, olive oil or melted butter, minced garlic, and chopped rosemary. Mix with a spoon until shaggy, then use hands to combine.
- If the dough feels sticky, add a tablespoon of flour at a time. If too dry, add a splash of water.
- Cover the bowl with a clean towel and let it rise in a warm place for 45 to 60 minutes until puffed.
- Preheat your oven to 400°F (200°C).
- Grease a cast iron skillet or any oven-safe skillet with olive oil or butter.
- Gently press the dough into the skillet. Let it rest for 10 to 15 minutes.
- Bake for 20 to 25 minutes until deeply golden on top. If browning too fast, cover loosely with foil.
- After baking, brush the top with melted butter or olive oil, sprinkle with flaky salt, and let it cool for 10 minutes before slicing.