Indulge in Nostalgia: Easy Steamed Cassava Cake Recipe
The first bite of Easy Steamed Cassava Cake brings a delightful symphony of flavors—a gentle steam rises, whispering secrets of sweet coconut and rich cheese. As you sink your fork into its tender, hash-brown-like texture, you can almost hear the distant echoes of laughter from family gatherings. That unmistakable aroma envelops you, transporting you back to Grandma’s kitchen, where love was the main ingredient.
The Origin & Heritage
Easy Steamed Cassava Cake, or "kue cassava," has deep roots in many tropical cultures, particularly in Southeast Asia and the Caribbean. Traditionally, cassava has been a staple food that has nourished generations. The warm, inviting scents of cassava cake remind many of joyous family gatherings, where stories were shared over a delicious feast. I vividly remember watching my grandma meticulously prepare this dish, blending coconut and cassava with love and care. It was more than just a cake; it was a bridge connecting our family’s past with the present—each slice laden with tradition and memory.
The Science of Flavor
- Natural Sweetness: Grated cassava is naturally sweet, which pairs beautifully with the creamy richness of coconut milk.
- Creamy Texture: The combination of sweetened condensed milk and evaporated milk creates a luscious mouthfeel that keeps you coming back for more.
- Cheese Contrast: Shredded cheddar cheese adds a surprising twist, balancing sweetness with savory depth.
- Moisture Balance: The melted butter helps retain moisture, ensuring that the cake remains soft throughout the steaming process.
- Perfect Steaming: Steaming instead of baking preserves the cake’s delicate structure and infuses it with humidity, enhancing flavors.
The Ingredients:
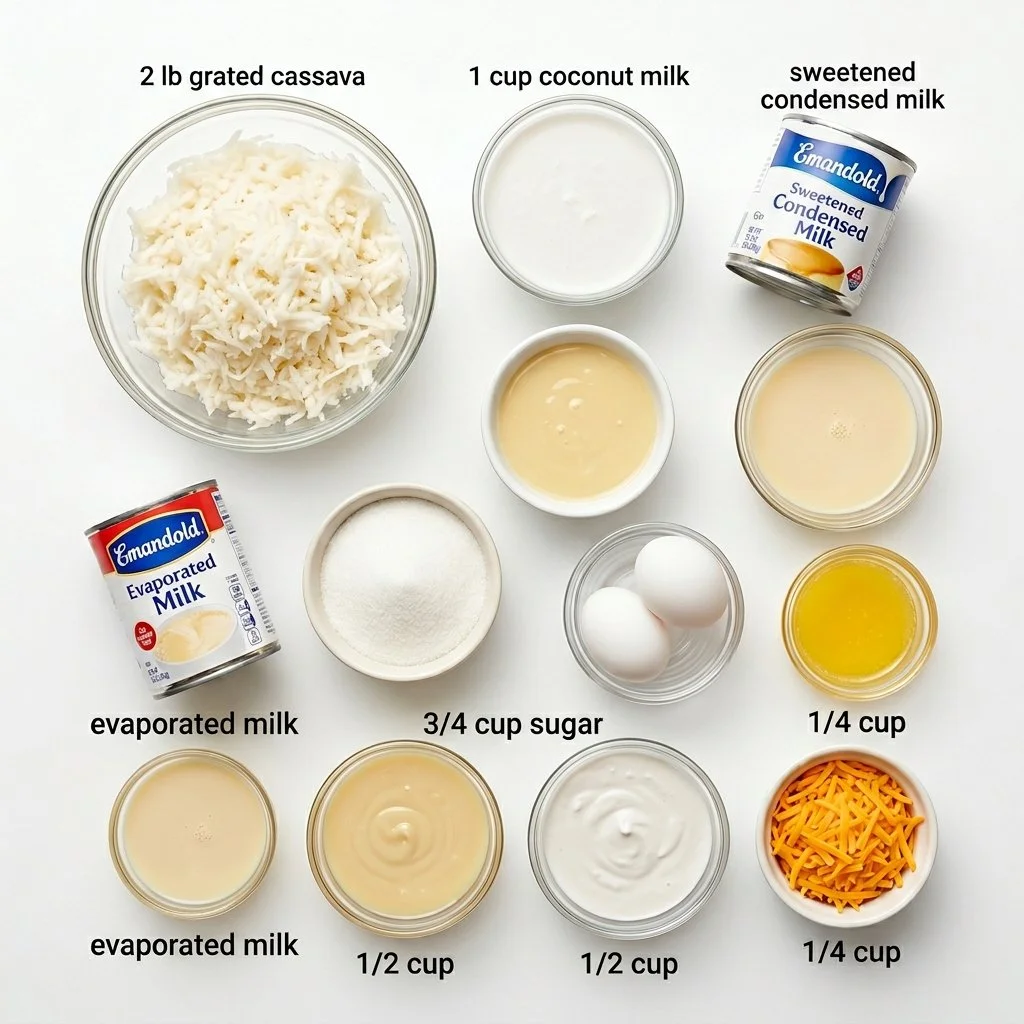
Essential Ingredients
- 2 lb grated cassava (thawed and drained if frozen)
- 1 cup coconut milk
- 1 can sweetened condensed milk
- 1 can evaporated milk
- 3/4 cup granulated sugar
- 2 large eggs
- 1/4 cup melted butter
- 1/2 cup sweetened condensed milk (for topping)
- 1/2 cup coconut cream (for topping)
- 1/4 cup shredded cheddar cheese (for topping)
Pro-Note: Quality Hacks
- Cassava: Opt for fresh grated cassava if you can find it, as it provides better texture and flavor than frozen.
- Coconut Cream: Choose a high-quality coconut cream for a more intense coconut flavor.
The Masterclass Instructions
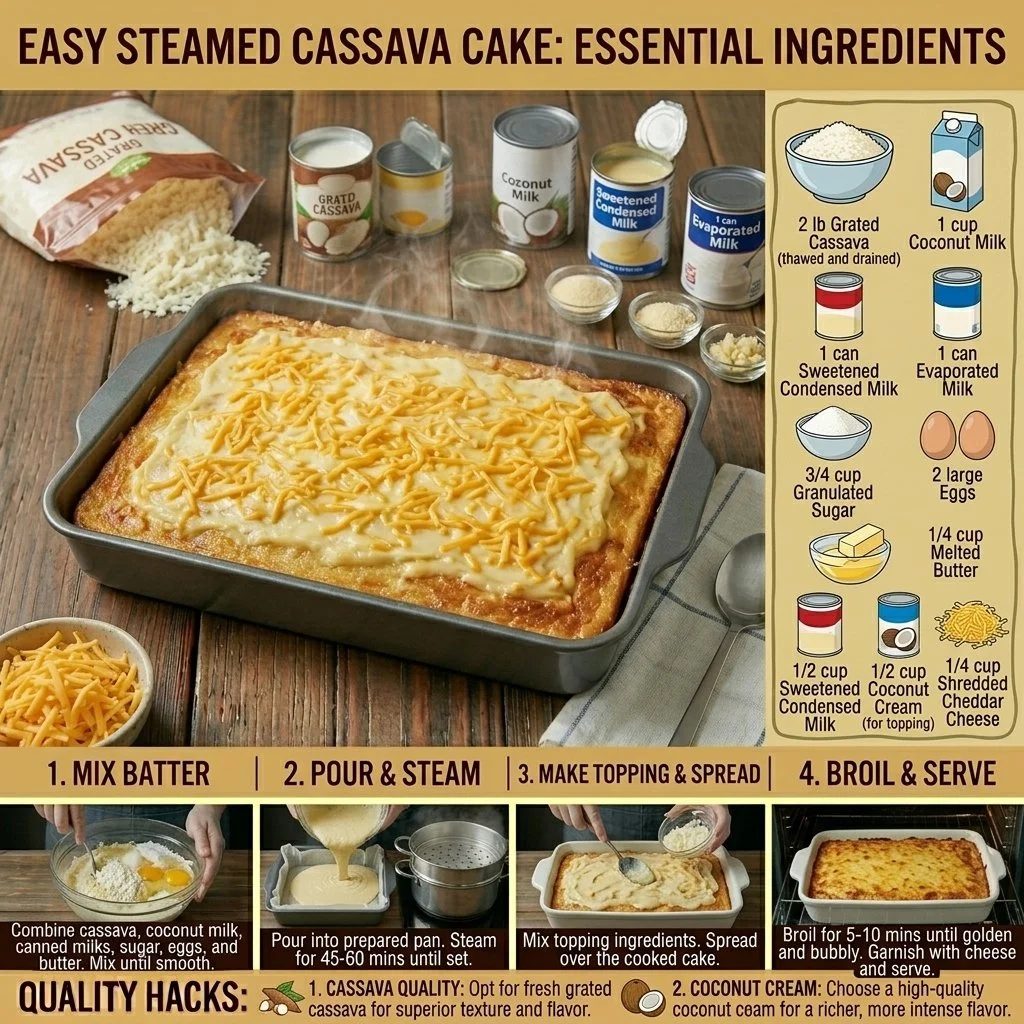
- Prepare your steamer: Lightly grease an 8-inch square pan or a similar heatproof steaming pan. Set your steamer over medium heat.
- Combine ingredients: In a large bowl, blend the grated cassava, coconut milk, sweetened condensed milk, evaporated milk, sugar, eggs, and melted butter.
- Mix well: Stir until the mixture is smooth and well combined—imagine a luscious, velvety blend filling your kitchen with irresistible aromas.
- Pour it in: Transfer the cassava mixture into the prepared pan, leveling it into an even layer with a spatula.
- Cover properly: Place a clean kitchen towel over the steamer lid to prevent any water from dripping onto the cake.
- Steam it: Cook for about 45 to 55 minutes, or until the center is mostly set—it should have a slight jiggle when shaken gently.
- Prepare the topping: In a small bowl, combine the remaining sweetened condensed milk, coconut cream, and shredded cheddar cheese.
- Add the topping: Carefully spread this mixture over the steamed cake, ensuring an even distribution.
- Final steam: Steam for another 10 to 15 minutes until the topping is set—let the warmth envelop you as you await the delicious result.
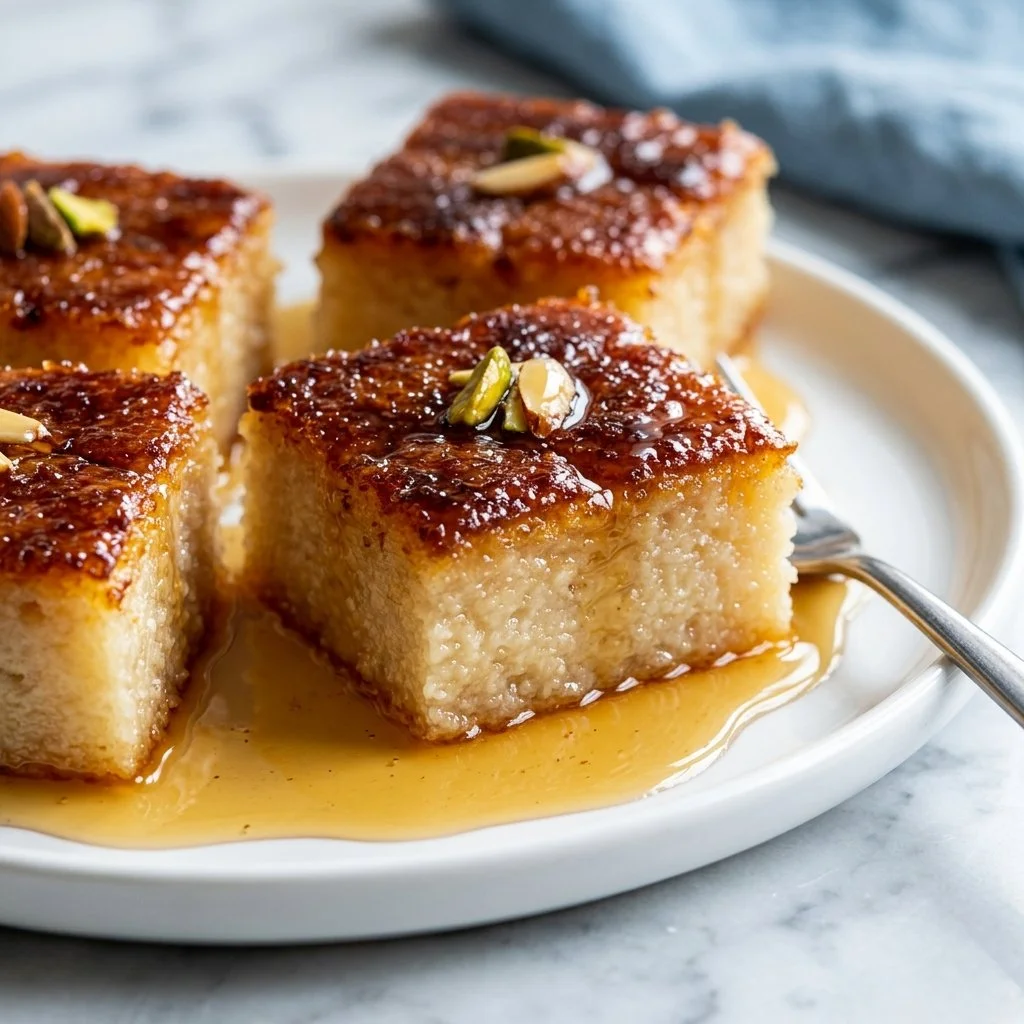
- Broiler step: For a golden top, pop the cake under the broiler for 2 to 4 minutes, watching closely to avoid burning.
- Let it cool: Allow the cake to cool completely before slicing; it’s essential for achieving perfect slices.
- Serve: Enjoy warm, at room temperature, or chilled.
A Healthier Perspective
If you’re looking to amp up the nutritional value of your Easy Steamed Cassava Cake, consider these tips:
- Sweetener Swap: Replace granulated sugar with monk fruit or coconut sugar for a lower glycemic index.
- Add Seeds: Mix in chia or flax seeds for added fiber and omega-3 fatty acids.
- Key Ingredient Health Benefit: Cassava is an excellent source of carbohydrates. It’s gluten-free and can provide energy without the downside of processed grains.
The Troublemaker
Why did my cake not cook through?: Ensure your steamer is adequately heated before placing the cake inside. Also, check the water level in your steamer; low water can lead to undercooking.
Why is my cake too dense?: This could happen if cassava is overly packed or if you didn’t mix the batter thoroughly enough. Aim for a light hand when mixing.
Why did my topping curdle?: Ensure to mix the topping ingredients well before spreading it to avoid separation while steaming.
The Art of Serving
To plate your Easy Steamed Cassava Cake beautifully, consider garnishing with a drizzle of coconut cream and a sprinkle of toasted coconut flakes. Pair with a refreshing cold drink like a coconut water or blended tropical smoothie. This dish is perfect for casual get-togethers or festive gatherings, adding a touch of warmth and love to your table.
The Dietary Lab
- Make it Vegan: Substitute eggs with flaxseed meal mixed with water, replace condensed milk with coconut milk, and use vegan butter.
- Gluten-Free: This recipe is inherently gluten-free thanks to cassava, making it suitable for those with gluten intolerance.
- Keto Adaptation: Use almond flour instead of cassava and erythritol to replace sugar for a lower-carb version.
Storage & Revival
- Yield: Serves 9-12
- Prep Time: 20 minutes
- Cook Time: 1 hour
The Revival Rule
When it comes to reheating, avoid using a microwave, as it can make the cake rubbery. Instead, gently reheat slices in an oven or air fryer at 350°F (175°C) for 5-10 minutes until warmed through.
FAQ

How long can I store Easy Steamed Cassava Cake?
You can store it in an airtight container in the refrigerator for up to 5 days or freeze for up to 3 months.
Can I use fresh cassava instead of frozen?
Yes, fresh cassava yields the best texture and flavor. Just ensure it’s grated properly.
What can I use instead of cheddar cheese?
You can use a non-dairy cheese alternative or omit it for a purely sweet cake.
Is this cake gluten-free?
Yes, Easy Steamed Cassava Cake is gluten-free, as cassava itself is a gluten-free root vegetable.
Can I make this recipe ahead of time?
Absolutely! Steamed cake often tastes better the next day as the flavors meld together.
Why is my cake soggy?
This can occur if too much moisture remains after steaming; ensure all ingredients are well-drained before mixing.
Can I add fruits to this recipe?
Yes! Adding fruits like ripe bananas or shredded coconut can enhance the cake’s flavor profile.
What’s the best way to slice this cake?
Use a sharp knife, and allow the cake to cool completely before slicing to achieve clean cuts.
How can I enhance the flavor?
Consider adding spices such as cinnamon or nutmeg for a warm, comforting taste.
Is this dessert typically served warm or cold?
It can be enjoyed at any temperature—warm, room temperature, or chilled—as per your preference.
As you embark on your culinary adventure with Easy Steamed Cassava Cake, I hope this recipe brings back fond memories and fills your home with love. Leave a comment below if you tried the Easy Steamed Cassava Cake! For more delightful desserts, check out my recipes for Coconut Macaroons, Sweet Potato Pudding, and Mango Sticky Rice.
Easy Steamed Cassava Cake
Ingredients
Method
- Lightly grease an 8-inch square pan or a similar heatproof steaming pan. Set your steamer over medium heat.
- In a large bowl, blend the grated cassava, coconut milk, sweetened condensed milk, evaporated milk, sugar, eggs, and melted butter.
- Stir until the mixture is smooth and well combined.
- Transfer the cassava mixture into the prepared pan, leveling it into an even layer.
- Place a clean kitchen towel over the steamer lid to prevent any water from dripping onto the cake.
- Steam the cake for about 45 to 55 minutes, or until the center is mostly set.
- In a small bowl, combine the remaining sweetened condensed milk, coconut cream, and shredded cheddar cheese.
- Spread this mixture over the steamed cake evenly.
- Steam for another 10 to 15 minutes until the topping is set.
- For a golden top, pop the cake under the broiler for 2 to 4 minutes, watching closely to avoid burning.
- Allow the cake to cool completely before slicing.
- Serve warm, at room temperature, or chilled. Consider garnishing with coconut cream and toasted coconut flakes.